Results 1 to 14 of 14
  1. #1
    Member
    Join Date
    Jan 2020
    Location
    Oklahoma
    Posts
    1,453

    2019 SHO 250 Lower Unit Paint

    Well... this low water can get anyone; it got me putting the boat on the trailer, 2019 Yamaha SHO 250, 21 fx skeeter.
    The prop sucked a rock off the bottom and screwed up the skeg. Off for a repair at the local prop shop who has a good rep for this.
    When I got the prop and the LU back, both were fine except the paint on the Lower Unit.
    So, unfortunately, I have to repaint the lower unit. Clearly the guy used the blue as the last coat, it looks like crap.
    Since it looks like a 5-year-old did the paint. I need some advice on sanding it down with what grit paper.
    I know I need to prep it correctly to get good result. There is some, (what I would call pitting) spots on the paint
    where it looks like a piece is missing. It reminds me of someone who painted over a missing chip on the house paint.

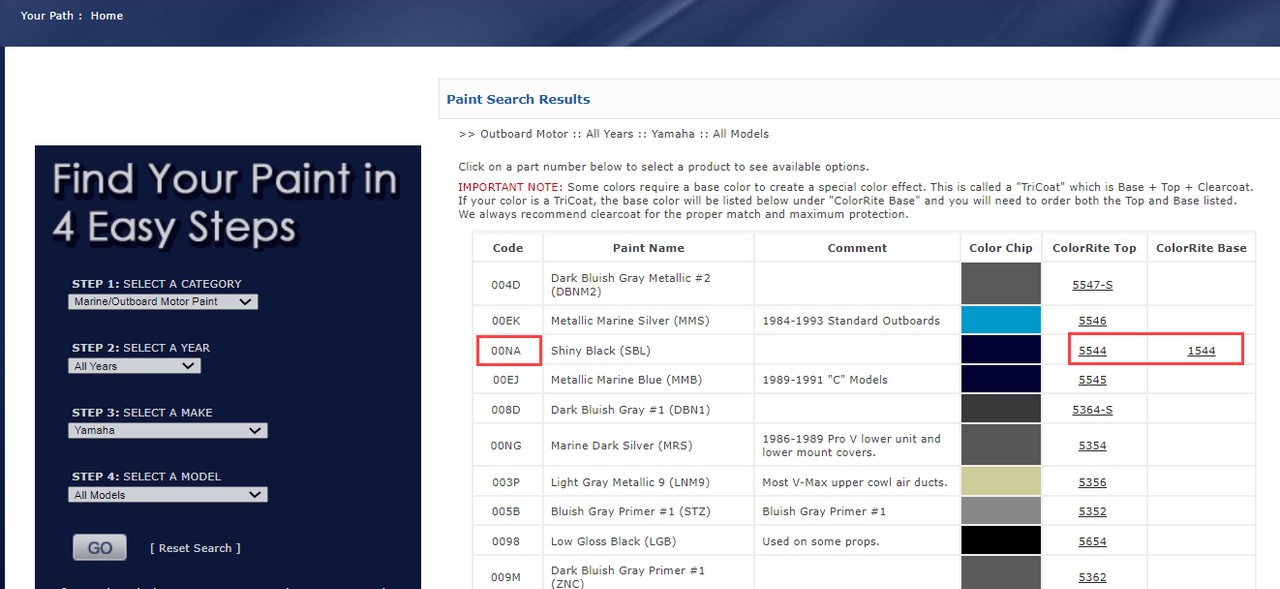
    Paint, I have the two colors, Blue the first coat then the black second color. Which gives that dark blue almost black color.

    I asked at the boat shop and they said it didn't need a primer.

    So do I take it to the metal, or just sand it down till I'm past the pit mark?

    Thanks for your advice!

  2. Member
    Join Date
    May 2015
    Location
    Broken Arrow, Ok
    Posts
    517
    #2
    Yamaha sells the paint in a single stage spray can. I have a can. They call the color ONA Shiny Black but it is the dark blue of the lower unit. I ordered mine online about a year ago.

  3. Member 78Staff's Avatar
    Join Date
    Mar 2012
    Location
    Cosmo, FL
    Posts
    4,905
    #3
    I need to clean mine up as well... as they say here in Florida, if you have paint on your skeg, you ain't trying hard enough lol, but I do want to touch mine up... As mentioned, Yamaha Shiny Black is the most often recommended color. Not sure I agree with the no primer recommendation, though and would expect to use a zinc chromate primer or similar since the lower is aluminum...


    amazon.com/Yamalube-ACC-MRNPA-Shiny-Black-Marine/dp/B07VDMMBTZ
    or
    amazon.com/dp/B00BO885Z4

    amazon.com/dp/B001F0O0ZU


    I also need to touch up a scar on my SHO 225 cowling, but not sure what paint I need for that... In my experience, auto touch up paint in general always seems to look worse, so haven't tackled it yet.

  4. Member
    Join Date
    Jan 2020
    Location
    Oklahoma
    Posts
    1,453
    #4
    Well the shop said it was 2 part, a blue then the shiny black. I just wanted the pro's and cons on preping the surface. It's not my first rodeo with paint. I just want to get it right. Uhhh do it once....

  5. Member
    Join Date
    May 2015
    Location
    Broken Arrow, Ok
    Posts
    517
    #5
    This guy looks like he might have your answers.


  6. Member
    Join Date
    Jan 2020
    Location
    Oklahoma
    Posts
    1,453
    #6
    Thanks OKS, using 80 grit sandpaper in his clip, that seems a little aggresive for me to start with.
    I'll have to have a plethora of sandpaper grit sizes.. at the end though, 2000 wet for a nice smooth surface.

    I thought I'd had a lot of responses on this subject. I quess not. So maybe I'll take pics and put together my findings.
    I guess I'm going to hit the fiberglass shop I know, and they might answer the riddle.

    Gotta get'er done while the temps are good this week in OK.


  7. Member
    Join Date
    Jun 2007
    Location
    SE, PA
    Posts
    1,426
    #8
    This ....Then top it off with their Clear Coat.

  8. Member
    Join Date
    Jan 2020
    Location
    Oklahoma
    Posts
    1,453
    #9
    Well... I spoke to my fiberglass guy, he told me this.

    Now this is subject to my requirements to remove the new paint the kid put on.

    1. Use acetone and remove the new paint. ( I started this today, and will finish this step tomorrow) It was the blue he put on there.

    2. use a 600 grit to sand down the surface, making sure to get a cross hatch for the paint to stick to. Wipe down with dry rag.

    3. clean with isopropyl alcohol

    4. Apply primer where necessary. ( I have basically the skeg to do ) Let dry 24 hours.

    5. Clean again, apply paint. If I do the 2-part spray, apply the blue, Let dry 24 hrs.

    6. Clean again, apply Shiny Black. Probably 2 coats to make me happy. Letting first coat dry 24 hrs before applying 2nd coat.

    I have taken some pics and will continue to do so through the process.

    Now my guy said if you're just cleaning up the LU. Hit it with the 600 in the area of concern, clean it and spray it with shiny black.
    go light and take your time.

    78 staff, he said you can use shiny black on cowling. Get a very thin paint brush, for painting pictures. Spray the paint on a paper plate then apply with brush slowly.
    Clean the area with isopropyl alcohol before painting. Your brush should be the same thickness or smaller than your scratch. It can take 3 coats to fill. If you over flood the scratch, the paint will run.

    More to come.......

  9. Member 78Staff's Avatar
    Join Date
    Mar 2012
    Location
    Cosmo, FL
    Posts
    4,905
    #10
    Quote Originally Posted by OK_BassBum View Post

    78 staff, he said you can use shiny black on cowling. Get a very thin paint brush, for painting pictures. Spray the paint on a paper plate then apply with brush slowly.
    [/I]Clean the area with isopropyl alcohol before painting. Your brush should be the same thickness or smaller than your scratch. It can take 3 coats to fill. If you over flood the scratch, the paint will run.

    More to come.......
    Good info, thanks. Yeah I have a small scratch where the garage door caught it coming down, had it backed up just a bit too far :(.

  10. Member
    Join Date
    Jan 2020
    Location
    Oklahoma
    Posts
    1,453
    #11
    As promised, the end product!
    Wow, I turned this into a job.
    First the Blue paint, then the uneven paint that remained.
    I sanded. The majority of the LU. I ended up sanding with a 300 to get things off then with the 600.
    cleaned surface with soap and water then alcohol. Primed, I took my time with this, I got a nice surface and then wet 600 sanded the primer.
    Cleaned again, soap and water then alcohol. I took me over 10 days to get the Metallic Gray and the Shiney Black on. (Weather/temps)
    Taking my time was the hardest part. The damn spray cans are the worst for painting. I tried to stay 10 to 12 inches away always from the LU.
    I did have to wet sand a couple of runs down. I used a piece of Qtr. round wood to help me get it wet sanded back to even.
    But I am happy with my results.

    Now to clean my greasy finger prints from installing it back on the motor and wax it.

    Ready to fish... uh.. gotta update the damn Humminbirds first....
    Attached Images Attached Images

  11. Member
    Join Date
    May 2015
    Location
    Broken Arrow, Ok
    Posts
    517
    #12
    Looks good.

  12. Member
    Join Date
    Jun 2004
    Location
    Lebanon, Missouri
    Posts
    3,033
    #13
    The fruit of you labor!

    I need to paint mine, but I'm considering flat gray as the color.
    Allison XB-21 ProSport
    Yamaha 250 SHO
    Croxton Razor 4XL

  13. Member 78Staff's Avatar
    Join Date
    Mar 2012
    Location
    Cosmo, FL
    Posts
    4,905
    #14
    I finally bought a can of the paint, but haven't hit it yet. Mine's more of a skeg touch up so will just prep sand, spray touch up, and maybe wet sand to clean up any paint/masking edges. Probably a good time to do it this week actually since I am changing out prop also...