


On the old Pro V you can't hardly find any link and sync tips online. It's mostly newer engines with fancy computer equipment put into the intake bolt holes to see if it's firing on the right mix. Those (afaik) don't work on the older, non fuel injected versions so here's my attempt to go through a full sync & link for my P175. The process should be similar for most any Yamaha outboard in the 1990s to maybe 2001 or so.
First, disconnect the battery and pull the emergency line by the key so the engine won't start.
Take out the top starboard top spark plug (go ahead and make sure it's clean and gapped at 0.035 now...) and stick a dial caliper depth gauge or dowel rod in there till it touches the piston.
Now turn the flywheel on top with one hand while you press in on the dowel rod with the other. The piston will go up and down.
When it's at the very top and just about to go back down (easier to see with a dial caliper), stop turning the flywheel and take note of the depth of the rod or caliper. From memory, I think mine was 0.13". This is your TDC, or top dead center. Now we're going to set the flywheel pointer for timing.
Turn the flywheel another round until the piston is coming back up.
Now I'll walk you through 115hp models, then give you the numbers for the rest.
For 115HP model stop turning at exactly 3.91mm (0.15 inches) longer than where your top dead center was. For instance, if your TDC was 0.13, then we stop turning the flywheel when the piston is on the upswing at exactly 0.15 more than 0.13, or 0.28 inches. Now freeze everything and jump up on the boat. See the flywheel pointer thing that tells you the timing? That's the flywheel timing plate. Set the flywheel timing plate (pointer thingy on the front) at 25* BTDC and tighten it down. Maybe put some blue locktite on it for good measure.
For 130/L130, turn it to 3.05mm (0.12 inches), timing plate pointer at 22* BTDC
For 150/L150, turn it to 3.61mm (0.14 inches), timing plate pointer at 24* BTDC
For ProV150, turn it to 4.88mm (0.19 inches wow!), timing plate pointer at 28* BTDC
For 175, 200, and L200 turn it to 2.53 (0.10 inches), timing plate pointer at 22* BTDC
For ProV200, turn it to 3.05mm (0.12 inches), timing plate pointer at 20* BTDC
That's it for the timing plate pointer, now you're starting from a true number instead of just trying to guess!
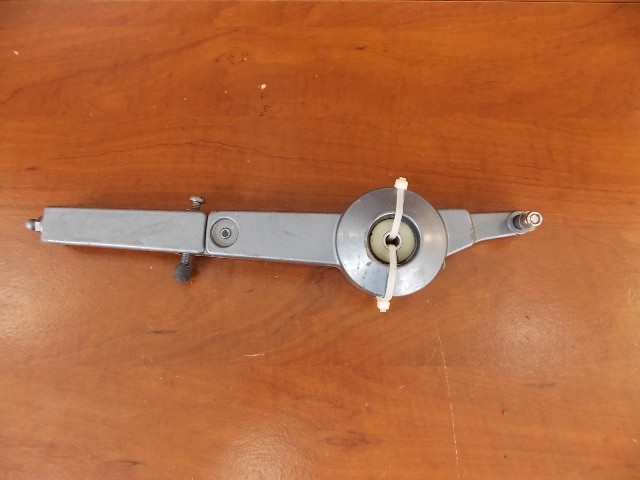
Now look at your magneto control arm. It looks like this, only going up and down in there instead of lying on a table. If yours is lying on a table, don't bother setting your timing. You have bigger problems!
Measure the distance of the snap-on screw connector on the top of the control arm going to the metal thing under the flywheel with your dial caliper.
For 115 - 130 hp it should be 60mm, or 2.36 inches.
For 150-200, it should be 54mm, or 2.56 inches
for ProV200, 63mm or 2.5 inches.
Measure the distance of the similar connector on the right side of the control arm also. That's called the Throttle cam control link.
For 115 - 130hp it should be 53mm, or 2.09 inches
For 150-200, 42.5mm or 1.67 inches
For ProV200, 61mm, or 2.38 inches
For 225 it's 72mm or 2.83 inches
Now turn your flywheel until the pointer points to 4 degrees ATDC (this is the short marks before 0 on the flywheel) for 150-130hp models.
Turn it to 6 degrees ATDC for 150-225 models.
Now adjust the "full retard" (Hahahaha! So relevant!) screw, that's the screw going from right to left and holds the arm away from the engine. On the bottom of the flywheel there is a very hard to see line. It should be near the line (looks like an arrow pointing outward) on the connection to the control arm. Line these two marks up by screwing the retard screw in or out.
That's it for the throttle link.
Now we can work on the carbs themselves. Be proud of yourself!
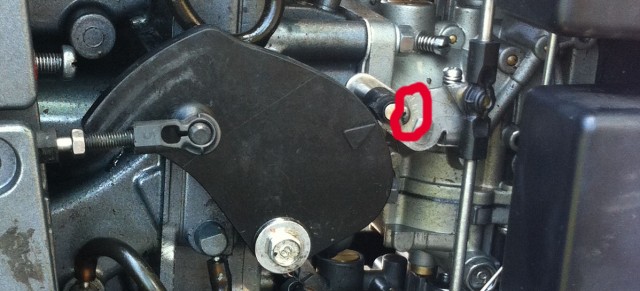
Loosen the roller adjusting screw here by turning it clockwise. It's a backwards turning screw, be aware!
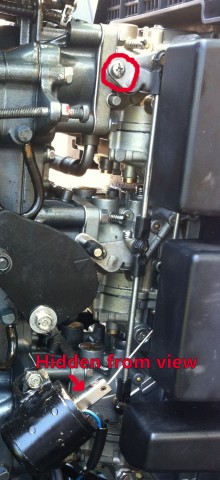
Loosen the throttle arm adjusting screw too. There's one on 115 and 130 hp models, two on 150-200hp. This pic shows a 175model.
Count the turns you take and write them down as you loosen the idle adjusting screw too until it isn't touching anything underneath anymore. It's behind the linkage.
Now verify that the deep butterflies on the inside (usually gold) of the individual carbs are fully closed - not the butterflies on the outside, those are operated by the choke - and tighten the screws up again by turning them LEFT. If they're not closed, wiggle the linkage you just adjusted to make them close, verifying they move freely. If necessary, hold them closed (your spring may be weakened by age) and tighten the screws by turning LEFT (opposite to the rest of the world) so that they are held in the closed position.
Now tighten the idle adjustment screw until it just begins to open the gold butterflies again. Once it just begins to open, turn it one full turn. You'll adjust this to within spec (below) once you start the motor.
Idle RPM Spec:
115 - 130 hp: 750 RPM plus or minus 50.
150 - 175 hp: 700 RPM plus or minus 25.
225 hp: 750 RPM plus or minus 25.
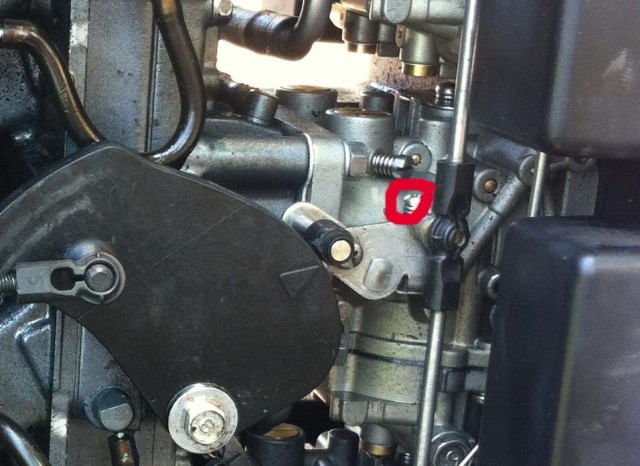
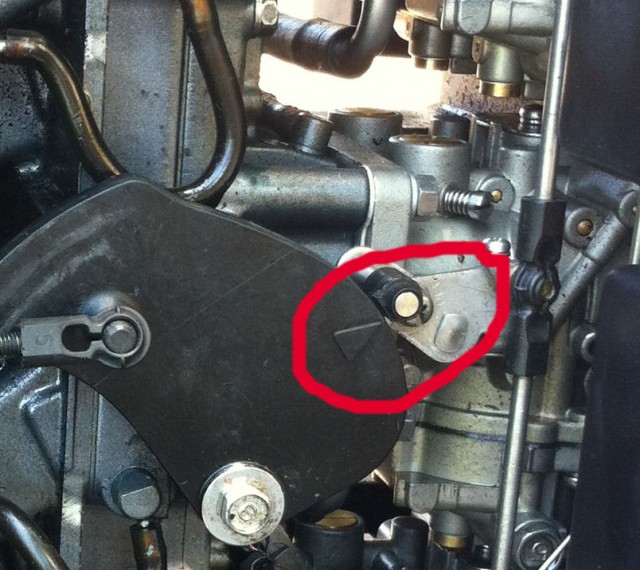
Now for an iffy part. Several people have reported that this NEVER lines up for them. If you did the above correctly, you should loosen the screw here again and push it down so that it touches the big plastic disc looking thing with an arrow on it. It should hit right where the arrow points. Then tighten it back up.
Now put muffs on the motor and start her up. Give it about 10 seconds to run any excess gas or anything through there and straighten out, then adjust that idle screw again until it's within spec (above). That's about it I think. Hope this helps some of you. (and hope I got all the steps in there!)
If you need to fiddle with your idle adjustment screws, here's the specs for those. Turn them inward until they're lightly seated, do not tighten! Then loosen them...
115hp - 5/8 of a turn
130hp - 7/8 of a turn
ProV150, 200, and 200L - Port side, 1 1/4 turns, Starboard side 3/4 of a turn.
150, 175, and 225 hp - 1 1/4 turns out.
ProV200 - 1 3/8 turns out.


 Reply With Quote