Results 1 to 11 of 11
  1. #1
    Member
    Join Date
    May 2009
    Location
    Cunningham, Ky.
    Posts
    2,017

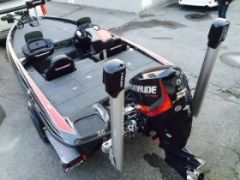
    1989 Hydra-Sports VS-150T new carpet and deck extension

    I had to repair a soft spot around the rear floor drain and replace the livewell pumps, so I decided to go ahead and do some things I was wanting to do for some time, while I had it down.

    Replaced all of the carpet.


    The original carpet did not have any trim and looked bad. I finally found something that would work and looks good.


    Replaced all of the old Perko lid pulls with new flush mounts. Old lid pulls were so small that I couldn't my fingers in them to open lids and they were busted up anyways. The new pulls are non-locking, but I can get three fingers in them and open the lids. I will make a locker bar if I decide to lock them up.


    The orinal front deck was very small and stopped just behind the front butt seat. I extended it all the way to the console, giving me twice the deck area that I had before.


    I inlet an aluminum angle into the rear hinge area to give more support to the screws that would go into the end of the plywood.


    The rear floor drain emptied into a blind box. There was no exit for the water to get out of the box, except for seepage around the 2 inch PVC pipe which came from the front. I just removed the drain and installed a step.

    1989 Hydra-Sports 17ft-6in. VS-150T
    Evinrude 150XP
    Hummingbird Electronics

  2. Member
    Join Date
    May 2009
    Location
    Cunningham, Ky.
    Posts
    2,017
    #2
    I have never had a seat strap snap last longer than a few days, so I replaced the original straps with velcro straps. I found a set of 27 inch velcro straps at Lowes, cut the buckle off and attached it to the seat top, attached the remaining strap to the seat bottom using existing snap components.

    If I decide to put rod tie down straps back on the deck, these straps would be good for that also.


    I replaced the non skid strip on the front of the boat with rubber non-skid pad from Harbor Freight. Also installed a rubber pad on the left side where the trolling motor wires rubbed the side. There was a Lawrance water Temperature unit on the right side that was broken, which I removed and covered the hole with another rubber pad.


    Replaced the big bulky edging on the console with the same edging I used for the carpet.

    Last edited by RCollins; 09-09-2014 at 09:50 PM.
    1989 Hydra-Sports 17ft-6in. VS-150T
    Evinrude 150XP
    Hummingbird Electronics

  3. Member
    Join Date
    Jul 2011
    Location
    Gatineau Qc Canada
    Posts
    1,857
    #3
    Sweet!!! Awesome job man!
    Where did you get your carpet trim I need some..

    What's next? Recess trolling motor pedal?
    Shawn.D
    2015 Phoenix 618pro w/ 150 Evinrude Etec HO

  4. Member jacksonmj's Avatar
    Join Date
    Oct 2009
    Location
    Aurora, CO
    Posts
    638
    #4
    Nice job do you have any more pictures of how you built the deck extension? I had the same boat and it was a nice boat wish I would have never got rid of it but hope to find something a little bigger now.

  5. Member
    Join Date
    Jan 2014
    Location
    savannah, texas
    Posts
    440
    #5
    ron. i like the look of that carpet trim too. where did you get it? nice work on the deck extension. i've had one for years and it's great having all that extra room up front and more covered storage.

  6. Member
    Join Date
    May 2009
    Location
    Cunningham, Ky.
    Posts
    2,017
    #6
    Thanks for the comments.

    The carpet edging I used is not actually intended for that use, but like I told my wife, I seldom use anything for what it was designed to be used for. It took a lot of searching the web to come up with something I thougt would work. One search led me to EBay where I found what I used. The one I used was 5/16 inch wide and has a 3/32 opening, which worked great, and you can't beat the price.

    Latest check of their website doesn't show the one I used, ( I may have bought all of it) but this is what I would have bought had I seen it at the time. They are actually designed as a metal edge trim.

    Black Rubber Edge Trim 1 16 x 3 16 Sold by The Foot | eBay

    www.Dawniewood.com


    You can always contact them and maybe find something different. I see several rubber hole gromets trim and buttons that I might find a use for.

    Installation is fairly easy but time consuming using Weldwood contact cement. Glue the edging down first, cut the carpet an inch or so past the edging and glue it down with Roberts 6700 to within 1/4-1/2 inch of the edging. Fold the carpet edge back so you can see the edging and carefully trim it to just shy of the back side of the edging. lift up the top edge of trim and tuck in under. Goof Off on a rag will always take care of any excess glue you may get on carpet or edging. Good luck.

    Here are some more pics of the edging.


    Last edited by RCollins; 09-10-2014 at 09:35 AM.
    1989 Hydra-Sports 17ft-6in. VS-150T
    Evinrude 150XP
    Hummingbird Electronics

  7. Member
    Join Date
    May 2009
    Location
    Cunningham, Ky.
    Posts
    2,017
    #7
    Quote Originally Posted by jacksonmj View Post
    Nice job do you have any more pictures of how you built the deck extension? I had the same boat and it was a nice boat wish I would have never got rid of it but hope to find something a little bigger now.
    I didn't take many pics of the rough in, but I will get you some more pics later today.
    1989 Hydra-Sports 17ft-6in. VS-150T
    Evinrude 150XP
    Hummingbird Electronics

  8. Member
    Join Date
    Jul 2011
    Location
    Gatineau Qc Canada
    Posts
    1,857
    #8
    Shoot, I was looking for something to ad to my boat now that the carpet is all done.
    Sounds like yours needs to be installed at the same time.
    Shawn.D
    2015 Phoenix 618pro w/ 150 Evinrude Etec HO

  9. Member
    Join Date
    May 2009
    Location
    Cunningham, Ky.
    Posts
    2,017
    #9
    Quote Originally Posted by ShawnD View Post
    Shoot, I was looking for something to ad to my boat now that the carpet is all done.
    Sounds like yours needs to be installed at the same time.
    Sounds like you need the actual peel and stick boat carpet trim.
    1989 Hydra-Sports 17ft-6in. VS-150T
    Evinrude 150XP
    Hummingbird Electronics

  10. Fishing is a Passion
    Join Date
    Oct 2011
    Location
    Wilmington, NC
    Posts
    3,399
    #10
    Great job, you can try this for a trim, worked great on my carpet install

    http://secure.terrys.net/search.php?desc=pt.37-551
    2002 Pro Craft 200 Super Pro- 2005 200 Mercury Optimax, Retired
    Empty Nester- Proud Grandfather 5-30-2014-Boy-Aiden, 8-2-2017-Boy-Calen

  11. Member
    Join Date
    May 2009
    Location
    Cunningham, Ky.
    Posts
    2,017
    #11
    I'll try to explain this the best I can:


    Materials used:

    (1) sheet of 23/32 plywood ( used about 2/3rds of it)
    Several 8ft. pine 1" x 2" (square edges)
    #8 and #10 x 1-1/4 and 1-1/2 inch stainless wood screws
    1/4-20 button head stainless machine screws
    (2) 3ft long 1/16 inch x 1 inch aluminum angle
    (2) quarts of fiberglass resin w/hardener
    (1) tube of PL glue
    (2) cans of Rustoleum truck bed liner paint

    Calculate the dimension needed to get the carpeted lids to be flush with existing floor when finished.
    Dimension= (2) x the thickness of plywood used + 1x2 board (1-1/2 inches) + (2) thicknesses of carpet used'
    Install 1x2 around the area of the compartment at this point,(if boat is not sitting perfectly level do this from a reference point on the boat, either from the floor up, or from a flat surface down, don't use a level.)
    Where I could get to the back side, I used a couple of machine screws thru the wall w/nyloc nuts for more support, plus some wood screws. Use some scrap pieces to mock up your lid height to make sure height is right.

    All pieces were cut and temporarily put in place to assure correct placement, marked for location , removed and coated with fiberglass resin and allowed to dry for 24 hours.
    PL glue, stainless screws and bolts were used for final placement.

    Plywood was cut to fit down on the supports, leaving 1/4 inch clearance on all outside edges ( so it didn't contact the sides and the black RTV was used to seal these areas.) Cut out your opening for the compartment leaving enough room for vertical inside edges (1x2 boards) 1x2 boards on lids plus (2) thicknesses of carpet, where carpet meets carpet.


    1989 Hydra-Sports 17ft-6in. VS-150T
    Evinrude 150XP
    Hummingbird Electronics