Results 1 to 13 of 13
  1. #1
    Member
    Join Date
    Sep 2011
    Location
    Shoreview,MN
    Posts
    959

    2002 Ranger 518vx Bench seat structure

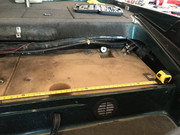
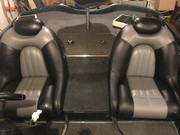
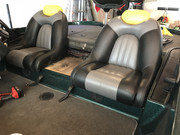
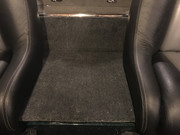
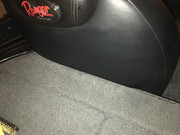
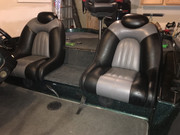
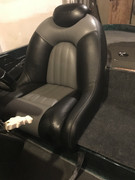
    Recently I got some new buckets for my 518. Eventually I may do a coin box but to start I want a clear path and step surface between the seats for people to walk through to the back deck. Tired of people stepping on my seats.

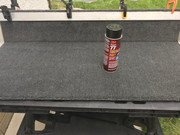
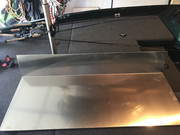
    That said I am trying to decide how I want to build the seat pan. Plywood is out of the question. Contemplating having an Aluminum pan fabricated. Basic design of the aluminum would be to have a base and back type design. I would then carpet the entire pan and back and mount it to the boat.

    Tonight a thought come to mind that might work great but maybe not. My idea would require me to strip the current bench down to just the plastic frame. Then re-work the frame in a way it could be used as the seat pan. I am all about re-purposing if it work and doesn't look ghetto.

    The down side is I have to destroy my bench, which has some tears and also my boys were looking forward to using it in their bedroom as s cool little couch.

    Does anyone have a photo of a bare plastic bench seat frame?

    Once I start, next week, I will add photos to this thread as I progress.

    Thanks!

  2. Member
    Join Date
    Sep 2011
    Location
    Shoreview,MN
    Posts
    959
    #2
    Wouldn't you know it, someone else thought of it before me.

    http://www.bbcboards.net/showthread.php?t=371135

  3. Member CastingCall's Avatar
    Join Date
    May 2012
    Location
    MN
    Posts
    5,115
    #3
    What kind of seats did you get?

  4. Member
    Join Date
    Sep 2011
    Location
    Shoreview,MN
    Posts
    959
    #4
    Ranger SRS buckets.

  5. Member CastingCall's Avatar
    Join Date
    May 2012
    Location
    MN
    Posts
    5,115
    #5
    Quote Originally Posted by Wormdunker View Post
    Ranger SRS buckets.
    Nice!

    The down side is I have to destroy my bench, which has some tears and also my boys were looking forward to using it in their bedroom as s cool little couch.
    Why not pull all the staples holding the old covering to the base as carefully as possible, then "fillet" the foam off the plastic base (try to keep vinyl cover in place over the foam) - then fab a plywood base and back (with legs) to mount the old foam and covering to the plywood? No need to waterproof the plywood for indoor use! You'd be able to salvage the foam/skin for that cool couch.

  6. Member
    Join Date
    Sep 2011
    Location
    Shoreview,MN
    Posts
    959
    #6
    Quote Originally Posted by CastingCall View Post
    Nice!


    Why not pull all the staples holding the old covering to the base as carefully as possible, then "fillet" the foam off the plastic base (try to keep vinyl cover in place over the foam) - then fab a plywood base and back (with legs) to mount the old foam and covering to the plywood? No need to waterproof the plywood for indoor use! You'd be able to salvage the foam/skin for that cool couch.
    Thats a good idea and an option if I try to use the frame. Leaning towards a fabricated aluminum seat pan. My idea would include a seat pan base and pan seat back in one aluminum piece. This should allow me to mount the pan onto the existing cap frame and mount the seats to the aluminum.

    The leading edge of the bucket bottom frames have 2 notches in the plastic bucket. Two stainless tabs are bolted to the glass seat frame they hook into the bucket notches. The tabs are obscure when the seat is installed, the tabs are why the seat only needs 2 Stainless screws in the seat back to hold it in place. I intend to have those tabs fabricated into my seat pan.

    All this so my kid has a couch in his room. Oh and I get a pretty sweet upgrade.

  7. Member
    Join Date
    Sep 2011
    Location
    Shoreview,MN
    Posts
    959
    #7
    Ok time for an update. It took a bit to get my seat pan fabricated but picked it up tonight and got to work. The seats are from a 2011 Z521, full set, buckets, fold down and fanny seat.

    Firs step was to change the headrest color from yellow to Black, After researching options (new headrests, new skins, Dye or paint) I decided to use SEM Vinyl paint and related prep products to re-color the headrests. I figure if this paint lasts a year or two it will be easy enough to repaint or buy new skins. The headrests have 2 anchor screws that anchor them to the seat and 3 Ranger plaque screws that hold the plaque to the headrest.....It took me 2 week to figure that out. The SEM product went on great, was easy and it looks like a factory skin, $40 for the kit.

    Next was deciding on a pan material. I went with 1/8" aluminum. The pan cost me $100 from a local metal fabricator. I had a roll of Ranger Ash carpet from my re-carpte job a couple years back. The pan fit like a glove, I carpeted it using 3M 77 adhesive. In my opinion the best adhesive for carpeting a boat. Next I screwed the seat pan into place. I was concerned about the transition from the pan to the live well bulk head. I found a 1" x 24" stainless Rub strake, see photos. I think I like how it cleans up the edge of the rolled carpet edge on my seat pan.

    Some of the photos show the fitment behind the seat, perfect match. I did lose a bit of leg room but it is not the end of the world, just a different feel.

    I have to comment on Rangers customer service. I was in need of assistance before and during this project. Connie Hill in the Upholstery dept was as she has always been, fantastic. She is a walking google machine when it comes to Ranger upholstery. Thanks you Connie.

  8. Member
    Join Date
    Sep 2011
    Location
    Shoreview,MN
    Posts
    959
    #8
    delete
    Last edited by Wormdunker; 05-23-2018 at 11:23 PM.

  9. Member
    Join Date
    Sep 2011
    Location
    Shoreview,MN
    Posts
    959
    #9


  10. Member CastingCall's Avatar
    Join Date
    May 2012
    Location
    MN
    Posts
    5,115
    #10
    Excellent job!! Man, the vinyl paint on the head rests turned out really nice - great match with the other black vinyl. The stainless rail gives it a factory-finished look too.

  11. Member
    Join Date
    Oct 2015
    Location
    Houston, TX
    Posts
    349
    #11
    Are the seats screwed to the pan or how are the connected?

    thanks

    ryan

  12. Member
    Join Date
    Sep 2011
    Location
    Shoreview,MN
    Posts
    959
    #12
    Quote Originally Posted by rubberdown View Post
    Are the seats screwed to the pan or how are the connected?

    thanks

    ryan
    2 stainless L-brackets screwed into the fuel bulkhead hook into 2 slots on the underside of the seat frame hold the front of the seat down on the bulkhead.

    3 - 3" Stainless screws through each seat back into the vertical rear deck wall. The seat does not rest on the pan per se. I did shim the seat leading edge of the outside seat bottom on the fuel bulkhead to level the seat to the contact point of the pan on the interior of the seat. The pan extends about 3.5" under the interior seat edge, there is some slight support from that contact point but not much. Reason there is not much is because the seat bottom has a recessed contour the pan sits under, support of the seat is minimal as a result.

  13. Member
    Join Date
    Aug 2011
    Location
    Lubbock, Texas
    Posts
    159
    #13
    Looks great. I was going to use my original frame...but might just have the pan made after looking at yours.