Page 1 of 2 12 LastLast
Results 1 to 20 of 25
  1. #1
    Member
    Join Date
    Feb 2016
    Location
    Jackson, GA
    Posts
    92

    1994 Johnson 150 Tilt/Trim Cylinder Rebuild

    I happened by the rear of my Ranger the other day and saw oil all over the lower unit and the tilt/trim. The tilt/trim unit was leaking pretty badly. I tried to run it up, but it moved very little before gurgling badly. Most of the oil was on the ground.


    It had leaked a couple of years ago and I put in some ATF which got it to work properly until now. Maybe the cold weather helped it fail? Anyway, I want to fish soon so it has to be fixed. I looked here and on YouTube for a how to instructional, but did not find any in detail. So, I plan to post pictures as I work it.

    I am open to suggestions on how to go about it. Especially if there are any special instructions anyone wants to offer. I have a Seloc book that has some instructions in it. I plan to follow the instructions in it unless someone has better information to offer.

    I began a couple years ago to gather parts and a tool to work on the unit, but never did the rebuild then. I did purchase the seal kit but I cannot find where I put it so I would not forget where it was put. That is going to cost me another $86 for a kit.

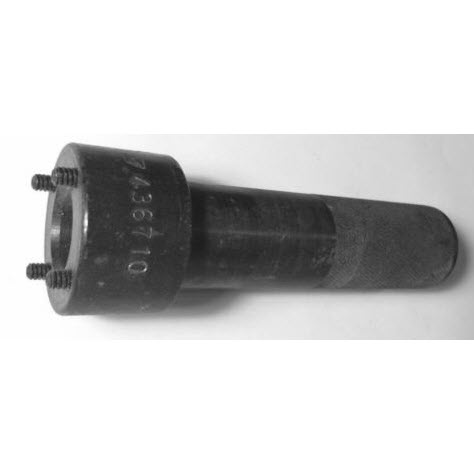
    I also bought a special tool to take the ends off the cylinders. The one I bought was an OTC Gland Nut Wrench 7463 from Summit Racing.


    It has 1/4" and 7/32" pins has adjustable diameter and works with a 1/2" drive wratchet. I was not sure it would work so I tested when I bought it. I was concerned about the strength of the tool being adequate to remove the cylinder caps since they had never been removed. But, I was able to loosen both trim cylinder caps without issue. I drilled out by hand two of the holes in the trim cylinder caps to allow the 7/32" pins to be used.


    Then I found that the pins are held in by set screws. So, I could have just made some new pins of the proper size from a drill bit and used them instead of drilling the caps. That would have been much easier. I was able to do get the Trim cylinder caps loosened without removing the unit from the engine.


    I also found that the unit had to be removed to get to the cap on the lift cylinder. That is when I decided to try the ATF to see if it would help the unit reseal itself.

    Yesterday my brother and I removed the unit. We followed the instructions in the Selco book. When it described removing the wiring, it did not give pictures or clear detail of what the connectors looked like. We just followed the lead coming in from the bottom of the engine cover and disconnected all of them to allow us to get the wires out of the hole. One of the connectors is too large for the hole and the wires must be removed from the connector.


    Then all the single wires are pulled out of the lower engine cover hole. Now the hole is just barely big enough for the rubber connector that connects the trim limit switch to be squeezed through. It was a very tight fit. Now the wire loom can be removed.


    We put a hoist onto the lower unit and used it to raise the lower unit and hold it securely while we removed the unit. (Sorry about the sideways pics. Anyone know how to fix it? I take most of my pictures sideways but these two I had the camera rotated.)


    The ground wire attached from the engine mount has to be removed from the pump housing using a 10mm socket. The trim limit switch has to be removed to allow the wires to be removed from the hole in the engine mount.


    Then the engine has to be high enough to allow the lift cylinder pin to be removed. Now the lower pin can be removed. This engine is very clean so the pins just pushed out without issue. We also found that the travel limit pin has to be removed to get the unit out. The rubber coated connector in the picture is the one that does not come apart but will barely fit through the lower engine cover hole.


    The safety support had to be raised back up while we removed the unit. Then we lowered it and lowered the engine back onto the safety support since it will be several days before we put it back on. The rest of the day was spent driving to a dealer to get the seal kit and some oil.

    Snow and very cold temps are expected over night and all day tomorrow. Maybe I will be able to get to cleaning the unit and draining it so I can bring it inside to do the rebuild.
    Attached Images Attached Images
    1994 Ranger 374V/1993 Johnson 150 Silver Star Series VJ150ELATR

  2. SC Club Moderator ChampioNman's Avatar
    Join Date
    May 2004
    Location
    Crawfordville, FL/Lake Hartwell, SC
    Posts
    71,276
    #2
    On the plug for the trim sender there is a tool called a pin extractor you can get one online or at a Grainger supply it looks like this.

    Use a small flat blade screwdriver inserted on to the back side of the female connector. This will let you pull the wires out of the connector and easily pull them through the hole on the clamp bracket. Don't know if you used the manual release screw to allow the motor to be lifted. Once you get the unit on the bench and get the tilt ram out you'll need to remove the nut on the end of the ram to do the seal replacement on that cap. While the unit is on the bench that is the time to fill it. once installed you can perform the bleed process.
    OMC/BRP has specific tools for removing the trim caps and the tilt cap and are listed in the trim unit service manual.

  3. Member
    Join Date
    Feb 2016
    Location
    Jackson, GA
    Posts
    92
    #3
    We did open the manual release screw to allow us to lift the motor. Thanks for showing me a tool that would make it easier. I will try to get one. Thanks for the info on how to do it also. I will use it.

    18 degrees this morning and still snowing. The wind is picking up and the temp is still falling. I will have to find a tub and bring it inside to clean it and work on it.

    Thanks again for the info.
    1994 Ranger 374V/1993 Johnson 150 Silver Star Series VJ150ELATR

  4. Member
    Join Date
    Feb 2016
    Location
    Jackson, GA
    Posts
    92
    #4
    It is lunchtime and still only about 20 degrees outside. That is cold for middle Georgia!


    I am glad we went out to get the parts yesterday. I am not going to play bumper cars with the other drivers out there. The part number for the o-ring and seal kit we got is 0434519. We bought some Johnson Tilt/Trim Fluid also.


    I brought a bucket into the laundry room and washed the tilt trim unit in it with dish washing soap and warm water. My wife is aggravated by a spot of grease I got onto the floor.


    I even cleaned out the wiper grooves with a toothpick. It is now pretty clean. No dirt and grit anyway.


    Here is a better picture of the wires and connectors still attached to the unit.


    I removed the nylon bushings which seem to be in decent condition except for the lift cylinder ones. One of them is cracked. So, I looked online at Boats.net and found them. I will be making another parts order but I will wait until ready to reinstall it before ordering.

    I also found that the boat is a 1994 but the engine is really a 1993 based on the model number. I think I already knew that but CRS kicks in often now.

    I read the overhaul instructions during lunch. According to the instructions, I need some Evinrude/Johnson Locquic Primer and Evinrude/Johnson Nut Lock to put onto the lift piston nut and rod threads. Is there a substitute Loctite product I could use instead? Only one nut gets it so buying it seems extravagant unless it is the only product that will work.
    Attached Images Attached Images
    1994 Ranger 374V/1993 Johnson 150 Silver Star Series VJ150ELATR

  5. SC Club Moderator ChampioNman's Avatar
    Join Date
    May 2004
    Location
    Crawfordville, FL/Lake Hartwell, SC
    Posts
    71,276
    #5
    Just use some loctite blue on the threads, just give it time to cure.

  6. Member
    Join Date
    Feb 2016
    Location
    Jackson, GA
    Posts
    92
    #6
    Thanks. I have some of that. Is there good reason to remove the motor and valve body? It is not leaking. I already have the lift cylinder out and am about to remove the two trim cylinders. They were what was leaking.
    1994 Ranger 374V/1993 Johnson 150 Silver Star Series VJ150ELATR

  7. SC Club Moderator ChampioNman's Avatar
    Join Date
    May 2004
    Location
    Crawfordville, FL/Lake Hartwell, SC
    Posts
    71,276
    #7
    Remove the thrust pad on the end of the ram, then you can slip off the cap and replace the O ring and wiper on the cap. Then screw in the thrust pad.

  8. Member
    Join Date
    Feb 2016
    Location
    Jackson, GA
    Posts
    92
    #8
    Yesterday after cleaning the unit I took the it outside to drain the oil from the reservoir. I am glad I did! Apparently, it was pressurized since we had to push the tilt cylinder down when we removed the unit from the boat. Oil sprayed out the cap when it was removed. To keep oil out of the house, I put a piece old plywood over a big box for a work table in the house garage and used an old cooking tray to catch any spills while I remove the cylinders.

    The reservoir had to be removed first to allow for removing the tilt cylinder cap so the gland wrench would work. The small bolts are actually 3/8" and not 10mm as I thought.


    The instructions said to then remove the filter plug with a 6mm Allen wrench.


    The filter had to be pulled out carefully with a pick. It is in good shape and I will clean it before reinstalling it.


    While the instructions listed removal of the pump and valve body next, I am thinking I will not remove those parts at all. They show no signs of leakage and seem to be working properly for now. The instructions say there are no serviceable parts in the valve body anyway. Also, I assume I can replace them at another time if needed. I am considering flushing the old fluid out with new fluid by temporarily installing the reservoir and adding some fluid. But I don't know if that will do any good, so I am still considering if flushing the pump and valve body is really necessary.

    I removed the tilt cylinder cap and piston next. The 1/4" pins on the gland wrench fit perfectly for the tilt cylinder. I took the unit back outside to fully remove the cylinder cap so if any pressure remained, I would not spray oil all over the garage. There was no more trapped pressure.


    The gland wrench would not fit at 180 degrees with only two of the holes drilled in the trim cylinder cap on one side. But since the cap was loose already, I was able to only put one pin in a hole and ease the cap anyway. I will drill the other two holes in the trim caps once the caps are removed for new seals. Otherwise, the gland wrench worked great.


    There were no obstructions on the other side and the cap came out smoothly.


    I unscrewed the caps on both trim cylinders. Once the cylinder caps are slid up the rod, there is some oil to drain and more to drain when the piston is removed from each cylinder.


    You may notice the "L" I scribed into the cylinder cap. I put an "R" on the other one when I removed it. I don't know if it matters which cylinder they go back in, but I am going to keep the parts sorted until they are reinstalled.

    After draining the oil and wiping the cylinders out, the cylinder bores looked good. There was some black sooty substance but it wiped out with the oil.


    Notice the flakes of paint that kept chipping off the unit and parts. I was very careful to keep them out of the cylinders. I held the unit up while removing the loose paint with my pocket knife. I am sure a paint chip will cause problems if left inside the unit.

    I will have to make a wood block for use in my vise out in my shop. That can wait until it warms up a little today. It is supposed to be 46 degrees this afternoon.
    Attached Images Attached Images
    1994 Ranger 374V/1993 Johnson 150 Silver Star Series VJ150ELATR

  9. SC Club Moderator ChampioNman's Avatar
    Join Date
    May 2004
    Location
    Crawfordville, FL/Lake Hartwell, SC
    Posts
    71,276
    #9
    This is the tool for the trim caps so you don't have to remove the reservoir.

    This is the tool for the tilt cap removal

  10. Member
    Join Date
    Feb 2016
    Location
    Jackson, GA
    Posts
    92
    #10
    Thanks for the pictures ChampioNman. I thought about making the tools, but found the one I used before I did. I make my own tools often.

    I took the three pistons and rods out to the shop to remove the nuts from the rod ends. I did not stay but long enough to loosen the nuts. It was 25 degrees in the shop and my fingers got frozen stiff.

    Anyway, first I measured the trim rods to be 0.698" diameter.


    Then I took a block of poplar wood and drilled an 11/16" and a 3/4" hole and cut the block in half. It turns out I did not need the 3/4" hole.


    The resulting two block's 11/16" hole was used to hold the trim rods securely in the vise while I used a 3/4" wrench to loosen the end plates. It took a quick rap with a hammer on the wrench to loosen them, but both came loose.


    Then I placed two small poplar wood blocks in the vise to sandwich the end of the tilt cylinder while I removed the 15/16" nut on the rod end. Again it took a quick rap with a hammer on the wrench, but it came loose too.


    Now I have the parts laying on the kitchen table waiting for new seals while my hands warm back up.


    I will get back to them after lunch.
    Attached Images Attached Images
    1994 Ranger 374V/1993 Johnson 150 Silver Star Series VJ150ELATR

  11. SC Club Moderator ChampioNman's Avatar
    Join Date
    May 2004
    Location
    Crawfordville, FL/Lake Hartwell, SC
    Posts
    71,276
    #11

  12. Member
    Join Date
    Feb 2016
    Location
    Jackson, GA
    Posts
    92
    #12
    I rebuilt the lift cylinder piston and rod first. I used a pick to remove the large O-rings on the cap and piston.


    Next the nut at the piston end was removed to allow removal of the piston and cap.


    There is an O-ring between the washer and the piston that has to be removed also.


    I was very careful to not allow the springs to fall out of the piston. There is a plunger and small steel ball under each spring. The springs, plunger and ball that must be reinstalled in the same hole later.


    The lift cylinder cap wiper seal was removed with a screwdriver.


    A pick was used to remove the rod seal from inside the lift cylinder cap.


    I installed the new O-ring and wiper seal into the cap. The wiper seal is installed with the lip pointing out. I was able to press it in by hand.


    Next I started removing springs, plungers and balls from the piston. I marked the first hole and the second one too so I would remember the direction to go to reinstall all of them. I laid all the springs, plungers and balls in a row.


    The piston and each spring was cleaned and then the parts reinstalled in order of removal.


    I wrapped some scotch tape around the rod threads and lift cylinder cap to allow me to install the O-rings without damaging them.


    Next I just slid on the washer and put the nut on loosely. I will torque the nut later out in the shop.

    I replaced the seals on the trim cylinder pistons and rods. Basically I used the same process to replace the trim cylinder piston and rod seals. Some of the trim cylinder seals are different types.

    This is the trim cylinder cap wiper seal.


    This is the rod seal that goes inside the trim cylinder cap.


    After cleaning the trim cylinder caps, I took them out to the drill press to drill out the all the holes to 15/64". That allowed the 7/32" pins on the gland wrench to fit much better.


    I guess I have used up the amount of space allowed for a post. Pictures are not posting now. I will try another reply to see if that helps.
    Attached Images Attached Images
    1994 Ranger 374V/1993 Johnson 150 Silver Star Series VJ150ELATR

  13. Member
    Join Date
    Feb 2016
    Location
    Jackson, GA
    Posts
    92
    #13
    I installed the trim cylinder cap seals and wiper next.


    The trim cylinder piston seal is not just an O-ring. It is a shaped ring and uses two thin plastic wipers.


    I took all of the rods back out to the shop and used the vise to hold them while I tightened them. I used blue Loctite as ChampioNman suggested on the lift cylinder rod nut and torqued it to 65 ft/lbs. I just tighten the trim cylinder rod ends cy hand after putting a small drop of blue Loctite on them.


    I then reinstalled the parts into the unit housing starting with the filter and plug. Then the trim cylinder rods were installed by carefully placing the piston end into the tapered section of the housing bores and wiggling them until the wipers slipped into the bore. It took a little finesse, but they went in finally. I left the caps loose so I could fill the cylinders with oil after the lift cylinder rod was installed and filled it with oil too. I just tightened the all three caps by hand for now. Sorry, I did not take any pictures of this,but it was pretty easy to accomplish.

    I took the unit back to the shop and put it into my vise so I could properly torque the cylinder caps. I used 65 ft/lbs. on them which is within the torque range stated in the manual.


    All that was left was to install the reservoir and O-ring. The three small bolts were torqued to 35 inch/lbs.


    Now the unit is ready to install on the engine.


    It may get installed tomorrow or this weekend. It will be warmer then.
    Attached Images Attached Images
    1994 Ranger 374V/1993 Johnson 150 Silver Star Series VJ150ELATR

  14. Member 86 inches's Avatar
    Join Date
    Feb 2011
    Location
    Phoenix, AZ
    Posts
    4,002
    #14
    1994 201 Champ re-powered with a 250 HO G2 E250LHAFA 05438419


  15. "OVER THE LINE SMOKEY!" headhigh's Avatar
    Join Date
    May 2008
    Location
    Moyock, NC
    Posts
    6,209
    #15
    I've been down this road. Not too bad of a job if you have the tools and skills.
    1998 Ranger R93
    1998 Mercury 200 EFI

    "Life, liberty, and the pursuit of happiness."

  16. Member
    Join Date
    Feb 2016
    Location
    Jackson, GA
    Posts
    92
    #16
    86 inches, I wish I had found your posting before I started. I must not be much good at searching the library. I would have not been as concerned with the task if I had read your post first. Thanks.
    1994 Ranger 374V/1993 Johnson 150 Silver Star Series VJ150ELATR

  17. SC Club Moderator ChampioNman's Avatar
    Join Date
    May 2004
    Location
    Crawfordville, FL/Lake Hartwell, SC
    Posts
    71,276
    #17
    Charlie,
    Great job! Just fill the unit while it is out of the boat, makes your life much easier. Then once installed and hooked up, you can do the bleed process. Open the manual release and let the skeg come down onto a block of wood, the run the trim up for a count of 5 then down for a count of 5 cycle it 5 times tighten the manual release valve an trim the motor up, deploy the trailer bracket and open the cap on the reservoir slowly. Check fluid and add if needed, if some comes out you are OK. Did the kit come with new O rings for the manual release valve? If so and if you didn't replace them, do it before filling. Remove the snap ring and then remove the valve. Install the O rings and then install the valve and snap ring then fill the unit.

  18. Member
    Join Date
    Feb 2016
    Location
    Jackson, GA
    Posts
    92
    #18
    The kit did come with the O-rings for the manual release valve. I will install them as you suggested. I may be able to get to that today.

    I have to wait for the nylon bushings to arrive to install the unit. One was missing on the tilt cylinder so that is probably why the other one was cracked. I ordered four new ones to replace them all. Thanks for the bleeding instructions.

    How full should I fill the reservoir? I did fill the cylinders as they were installed up to the threads already.
    1994 Ranger 374V/1993 Johnson 150 Silver Star Series VJ150ELATR

  19. Banned
    Join Date
    Jun 2012
    Location
    grovetown ga
    Posts
    232
    #19
    Great illustration will be very helpful for me are anyone rebuilding trim pump, down the road from you in augusta an it show nuf been cold.

  20. Member
    Join Date
    Feb 2016
    Location
    Jackson, GA
    Posts
    92
    #20
    I got back to finishing the rebuild and installing the manual release valves seals yesterday afternoon. ChampioNman, thanks again for good advice. The small O-ring was very worn and almost broken when I removed the valve. I first took out the snap ring.


    Then I cleaned off the loose paint before removing the valve.


    The valve just unscrews from the bore.


    It was pretty easy to replace the two O-rings.


    There is a flat rubber looking piece at the end of the valve, but that did not appear to be serviceable and there was not a replacement in the kit. So, I just replaced the two O-rings and reinstalled the valve and snap ring.


    The nylon bushings are supposed to arrive today. Maybe I can get it back on the boat today or tomorrow!
    Attached Images Attached Images
    1994 Ranger 374V/1993 Johnson 150 Silver Star Series VJ150ELATR

Page 1 of 2 12 LastLast