Page 3 of 4 FirstFirst 1234 LastLast
Results 41 to 60 of 64
  1. Member Hammmerhead's Avatar
    Join Date
    Oct 2016
    Location
    Ozark's
    Posts
    816
    #41
    Quote Originally Posted by kissfan4 View Post
    Looks good, will hopefully be ordering my carpet once my samples get here.
    Thanks. It was a bigger chore than I had planed on, but worth it. A few guys here doing Tracker carpet right now, so help is here if you need it, I know I did. Take a few pictures of the front storage box and the small pieces there. Also snap shots of the floor frame layout and draw a picture with measurements so you can hit the floor rails with self tappers the first time. Stainless self tappers with the large flat head are tough to come by, so you might want to order some online. You will likely strip a few and maybe bend a couple removing them.

  2. Member
    Join Date
    Apr 2016
    Location
    Kingwood, Texas
    Posts
    23
    #42
    That Gunmetal Gray looks great on there and you've done an awesome job!

    I'm at the glue-stripping phase of this same project on my PT 165 (http://www.bbcboards.net/showthread.php?t=787416) right now and I can attest to the abundance of carpet on these boats, even my smaller, older model. Fortunately, the widest point on my 165 is only 68", so I should be able to get by with the 6' roll. I'm looking at using basscarpetbuys.com, too, since it's only $7.99/ft. I'll probably use the same color as you, but I have some samples en route before I decide. I'm going to take measurements for every square inch of deck/trim/lids/etc. and try to diagram everything using design software so I can use the roll as efficiently as possible and get by with buying as little as necessary. Then again, that 10/ft minimum order might come back to bite me if I don't get it right. I should probably order a few extra feet in case of the inevitable screw up on my part.

    The flat SS self-tapping screws were an absolute PITA for me on the floor of my boat. They were so brittle and my drill instantly stripped the heads when I tried to remove them. I ended up having to drill holes around the edges of at least a dozen screws until I could fit my vice grips around the head. I had already planned on replacing the wood, so it's not that big a deal. It just caused a 15 minute floor removal project to turn into about 4 hours of work.

    Question: How's the cushioning with their 20oz carpet? I'm sure it's a solid upgrade from the factory carpet, even when that stuff was brand new. But do you think regret not adding a layer of carpet padding on the decks/floor? I'm considering it for my project, but I'm not convinced yet that I really need it.

    Another question: I'm planning on extending my deck all the way to the front of the back of the console (steering wheel side) so I can fit up to 7'6" rods. The center will be one large center rod locker and I'll add 2 small utility storage lockers on each side like the new PT 195's:


    In order to do this, I need to cut out some of the foam in order to fit the shape of the aluminum frame and sheeting I'm going to rivet in. Did you have to cut out any foam? I think you mentioned you had a water-logged patch...what's your recommended method of doing this? Also, did you replace the cut-out foam, or just leave it out? My foam is bone dry since it's been sitting in my garage for a year, but before I got it, it was sitting outside uncovered for 10+ years. Any ideas on how to tell if the foam is bad even though it's no longer holding water, or is it OK so long as it's now dry and aired-out?

    Sorry for all the questions - just trying to take advantage of the experiences of those that have come before me!
    A Work In Progress:
    2000 Tracker Pro Team 165
    1996 Force 40 2-Stroke
    Build Thread: http://www.bbcboards.net/showthread.php?t=787416

  3. Member
    Join Date
    Jan 2011
    Location
    Columbus Ohio
    Posts
    843
    #43
    Great job!

  4. Member Hammmerhead's Avatar
    Join Date
    Oct 2016
    Location
    Ozark's
    Posts
    816
    #44
    Quote Originally Posted by sokmace View Post
    That Gunmetal Gray looks great on there and you've done an awesome job!

    I'm at the glue-stripping phase of this same project on my PT 165 (http://www.bbcboards.net/showthread.php?t=787416) right now and I can attest to the abundance of carpet on these boats, even my smaller, older model. Fortunately, the widest point on my 165 is only 68", so I should be able to get by with the 6' roll. I'm looking at using basscarpetbuys.com, too, since it's only $7.99/ft. I'll probably use the same color as you, but I have some samples en route before I decide. I'm going to take measurements for every square inch of deck/trim/lids/etc. and try to diagram everything using design software so I can use the roll as efficiently as possible and get by with buying as little as necessary. Then again, that 10/ft minimum order might come back to bite me if I don't get it right. I should probably order a few extra feet in case of the inevitable screw up on my part.

    The flat SS self-tapping screws were an absolute PITA for me on the floor of my boat. They were so brittle and my drill instantly stripped the heads when I tried to remove them. I ended up having to drill holes around the edges of at least a dozen screws until I could fit my vice grips around the head. I had already planned on replacing the wood, so it's not that big a deal. It just caused a 15 minute floor removal project to turn into about 4 hours of work.

    Question: How's the cushioning with their 20oz carpet? I'm sure it's a solid upgrade from the factory carpet, even when that stuff was brand new. But do you think regret not adding a layer of carpet padding on the decks/floor? I'm considering it for my project, but I'm not convinced yet that I really need it.

    Another question: I'm planning on extending my deck all the way to the front of the back of the console (steering wheel side) so I can fit up to 7'6" rods. The center will be one large center rod locker and I'll add 2 small utility storage lockers on each side like the new PT 195's:


    In order to do this, I need to cut out some of the foam in order to fit the shape of the aluminum frame and sheeting I'm going to rivet in. Did you have to cut out any foam? I think you mentioned you had a water-logged patch...what's your recommended method of doing this? Also, did you replace the cut-out foam, or just leave it out? My foam is bone dry since it's been sitting in my garage for a year, but before I got it, it was sitting outside uncovered for 10+ years. Any ideas on how to tell if the foam is bad even though it's no longer holding water, or is it OK so long as it's now dry and aired-out?

    Sorry for all the questions - just trying to take advantage of the experiences of those that have come before me!
    Thanks for the kind words!


    I sure wouldn't try and save 20 or 30 bucks on getting just the amount of carpet you need, and it was easy to make a mistake for me. Also, I would be leery of 8 dollar carpet, unless you were getting it on sale. Maybe you can find someone that has bought this brand before? You sure don't want any glue to bleed through from cheap crappy backing that cracks immediately when you make the first flex or bend with it. The 20 oz carpet is the way to go, 24oz and you may have problems with tight lids.

    My foam dried out and I just let it be. This boat spent some time outside before I got it in this past November. I was worried about cutting the foam and making an opening to where it would absorb a lot of water, because I don't think its closed cell foam. Im afraid you will have to puncture the foam to find out if it has moisture in it, just seal the hole.

    I don't know how big your rod locker is, but I could get 8 footers easy in my box once I modded the aluminum rod chutes. Right now I just have 5, 6'9" to 7' rods, but Im going to get a 7' 3" and a 7' 6" rod this summer. Im hoping to get 8 rods in there total without it being too congested.

    I considered using foam padding on the front deck, but as the project rolled on I decided to let it go. Im trying to do all my mods on a budget and not go over-board, so If I trade boats this fall, I won't have too much tied up in it.
    Last edited by Hammmerhead; 02-23-2017 at 11:29 PM.

  5. Member
    Join Date
    Apr 2016
    Location
    Austin, Arkansas
    Posts
    1,139
    #45
    That's a fine looking piece of work there. Enjoy the new looking boat!

  6. Member
    Join Date
    Jan 2017
    Location
    Owasso
    Posts
    9
    #46
    Turned out great! Your attention to detail makes a big difference in the finished product.

    Where did you get the motor decals and the deck screws?

  7. Member Hammmerhead's Avatar
    Join Date
    Oct 2016
    Location
    Ozark's
    Posts
    816
    #47
    Quote Originally Posted by DPI View Post
    Turned out great! Your attention to detail makes a big difference in the finished product.

    Where did you get the motor decals and the deck screws?


    Thank you DPI and thanks for your help!


    Decals. Not cheap, but mine were shot. ($65) They only problem with them is the front pieces that connect each side of the decal really didn't align right with the side decals. They were too tall. Going to have to do some trimming to the height of them, but it looks so much better, Im not worried if get them on or not.

    http://www.ebay.com/itm/110685917133...%3AMEBIDX%3AIT


    I used all my old self tappers and was only needing 3 or 4 in the end. I just bought stainless non self tapping flatheads from Lowes and used them where I could pre-drill the holes easy. They come in packs of 6 for 1.5" and packs of 5 for 2". Just make sure you get the large flat heads.

  8. Member Hammmerhead's Avatar
    Join Date
    Oct 2016
    Location
    Ozark's
    Posts
    816
    #48
    Quote Originally Posted by Goldstar225 View Post
    That's a fine looking piece of work there. Enjoy the new looking boat!
    Thank you!

  9. Member
    Join Date
    Jan 2017
    Location
    Owasso
    Posts
    9
    #49
    Did you reinstall the rod holder platform/bracket inside the rod holder compartment? If so, how did you do that without having screws or rivets showing on the outside of the compartment?

  10. Member
    Join Date
    Aug 2004
    Location
    SE WI
    Posts
    11,088
    #50
    Hammerhead you do great work It looks awesome
    2019 Ranger Z520C DC / 250 Pro XS 4 Stroke

  11. Member Hammmerhead's Avatar
    Join Date
    Oct 2016
    Location
    Ozark's
    Posts
    816
    #51
    Quote Originally Posted by Bassin Bob71 View Post
    Hammerhead you do great work It looks awesome
    Oh I can show you my flaws and mistakes, but thanks Bob!

  12. Member Hammmerhead's Avatar
    Join Date
    Oct 2016
    Location
    Ozark's
    Posts
    816
    #52
    Quote Originally Posted by DPI View Post
    Did you reinstall the rod holder platform/bracket inside the rod holder compartment? If so, how did you do that without having screws or rivets showing on the outside of the compartment?
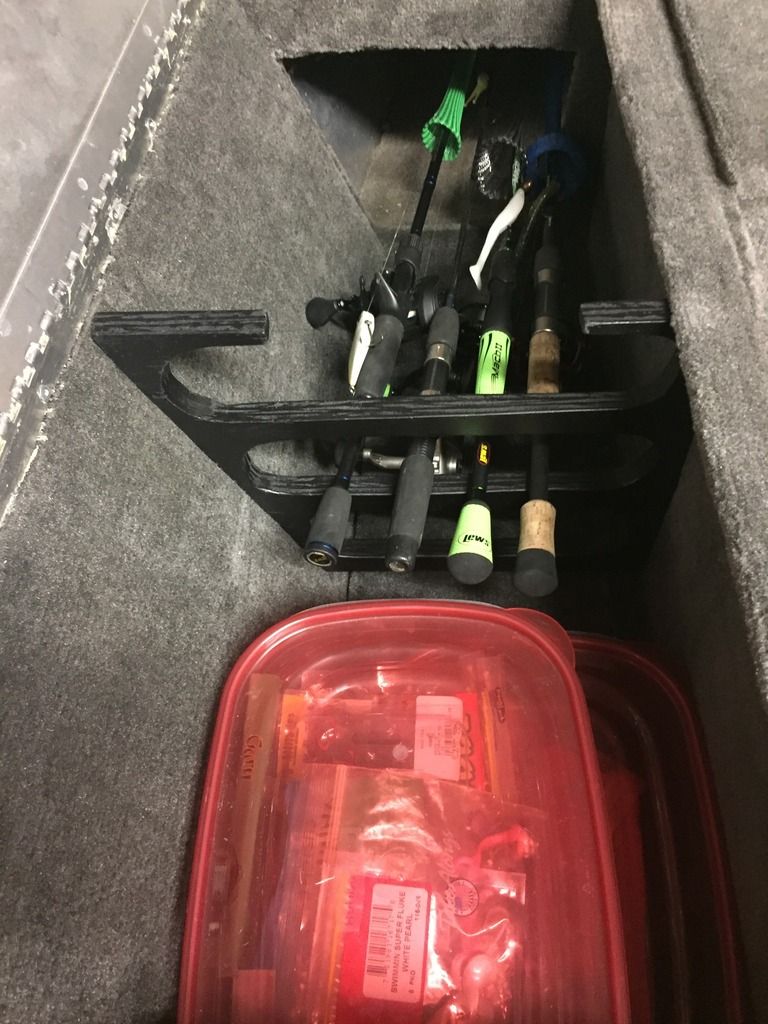
    Don't think Im going to use it. I am making a rod butt rack, but my CNC abilities via "jigsaw" aren't too good. As far as hiding the rivets go and attachment, I will have to use the inside passenger panel on the side of the boat, the floor and the top lip of the rod box to not put anything on the side that you can see.

    I just cut this piece from a scrap of the new front deck. I rushed a little bit and I didn't count on it working or fitting as good as it did. 10 rods will be fine in the rack. Spinning reels work great on the middle cutout and there is enough height so they hang without riding on the floor. Im just going to keep my go-to rods on the first two cutouts and keep the other rigs on the bottom cutout, but they will basically laying on the carpeted floor.

    I was going to try and rig tubes, but just not enough space. You could cram 15 rods in there now, but rod sox are a must.

    Also, since I knocked down that chute lip that was in the rod chute under the deck, you can put the rods a lot further forward. This butt rack is going to go almost 2 feet forward in the box so I can put rubbermaid containers with all my plastics behind it. Will get some pics up when the paint dries

    Not pretty, but pretty functional.


    Update:

    Here it is in the box. Lots of room behind the butt mount to put filing trays for 3700's or stack the Rubbermaid's. Two 7' rods there and still enough length for 8 footers. I would have taken the rack further forward, but the opening gets a little tight when pulling the rods out.


    Brackets are down. The one pop rivet is on top of the lip of the box cant be seen with lid shut. Pop rivets for both top brackets and bottom are screwed to floor. Its solid.


    Looks like it was whittled out of soap, but its a $5dollar rod rack.


    Last edited by Hammmerhead; 03-04-2017 at 01:43 AM.

  13. Member
    Join Date
    May 2013
    Location
    Conroe, TX
    Posts
    78
    #53
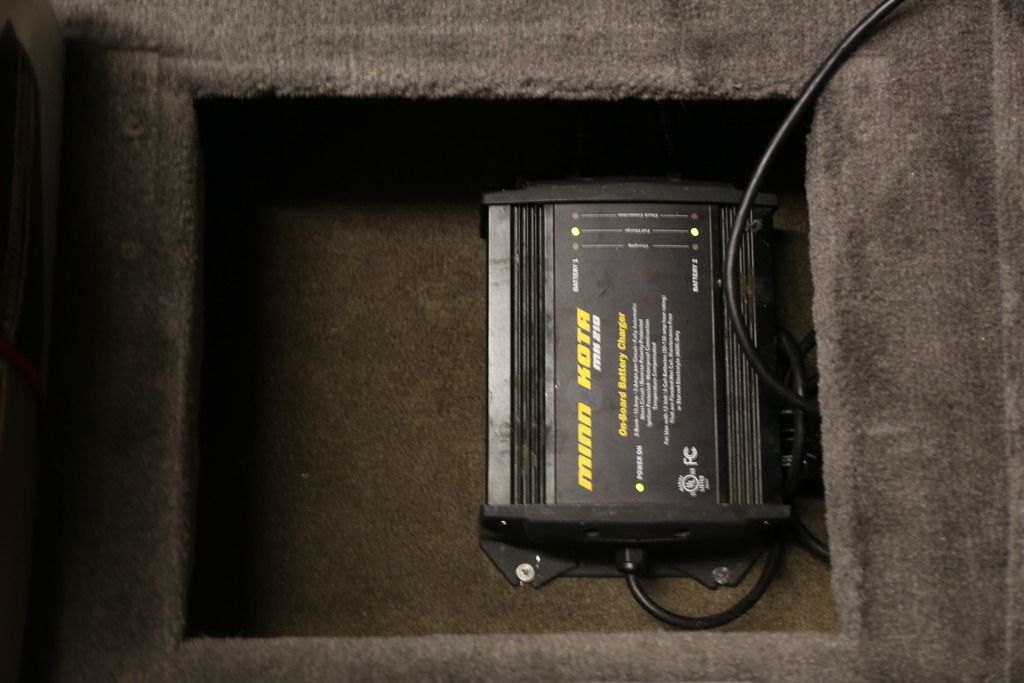
    [QUOTE=Hammmerhead;8155958]Mounted charger under pass. seat and ran wires under the live well, but above the battery floor and right to the battery area. It was surprisingly easy with a fish tape.

    [QUOTE]

    I'm adding a 3 bank charger to my '09 PT 175 TXW and was thinking about mounting it in the same place. Did you have to remove the livewell to get the wiring under there or did you have to do it with the deck off? Just wondering about where to make my holes. Thanks!

  14. Member Hammmerhead's Avatar
    Join Date
    Oct 2016
    Location
    Ozark's
    Posts
    816
    #54
    [QUOTE=made-in-tx;8187806][QUOTE=Hammmerhead;8155958]Mounted charger under pass. seat and ran wires under the live well, but above the battery floor and right to the battery area. It was surprisingly easy with a fish tape.


    I'm adding a 3 bank charger to my '09 PT 175 TXW and was thinking about mounting it in the same place. Did you have to remove the livewell to get the wiring under there or did you have to do it with the deck off? Just wondering about where to make my holes. Thanks!
    Its simple and you dont have to remove anything. You will need a decent sized fish tape and since you have a 3 bank your hole will probably need to be bigger than mine. 1.5" or so if you're going to use wire loom all the way back, maybe slightly smaller.

    Drill your hole at the back wall as low as you can to the floor of that storage area. My '04 livewell is setback a good bit and is above the hole I drilled. Yours may be different, but I doubt it. I will get you a picture of where I drilled in a bit.

  15. Member Hammmerhead's Avatar
    Join Date
    Oct 2016
    Location
    Ozark's
    Posts
    816
    #55
    Here you go. You can see the distance from the left of the support.


  16. Member
    Join Date
    Jan 2007
    Location
    Encinitas
    Posts
    203
    #56
    Quote Originally Posted by Hammmerhead View Post
    Looks great! Your work looks better than mine. I honestly don't know if it would be possible to find another tin boat the same size that has this much dang carpet. I like the padding under my feet, but my next rig may be sprayed.

    I don't know if Im going to have enough carpet either and Im currently at 1.5 gallons of glue used and Im pretty sure I will need another gallon. I knocked out the big pieces first except the front deck. I thought it was down hill from there until I started figuring on doing the interior AND exterior pieces of the front storage and the rod box and then it adds up quick. Im rushing to try and get done so I can get on the water. Even by myself, a 3 year old and limited time, I still didn't think it would take this long to knock it out.


    Feel free to post more pics in this thread as you go as I could use the extra motivation!

    That color with the red looks great.
    What glue did you use to stick the carpet to aluminum?

  17. Member
    Join Date
    Dec 2016
    Location
    Bay Area CA
    Posts
    18
    #57
    Hammerhead looks awesome bro.

  18. Member Hammmerhead's Avatar
    Join Date
    Oct 2016
    Location
    Ozark's
    Posts
    816
    #58
    Quote Originally Posted by Steiger117 View Post
    Hammerhead looks awesome bro.
    Thanks for all your help Steiger. It was actually you posting your carpet job on your 175 that got me going to do mine.

  19. Member Hammmerhead's Avatar
    Join Date
    Oct 2016
    Location
    Ozark's
    Posts
    816
    #59
    Quote Originally Posted by T-SHRED View Post
    What glue did you use to stick the carpet to aluminum?

    Basic indoor/outdoor carpet glue

  20. New England Forum Moderator twitch's Avatar
    Join Date
    Mar 2005
    Location
    New Bedford, MA
    Posts
    14,965
    #60
    Great job Hammerhead boat looks fantastic and I really like the motor without the decals ...lol but that is just me
    1990 374V Ranger Still kickin' bass after all these years

Page 3 of 4 FirstFirst 1234 LastLast