Page 1 of 3 123 LastLast
Results 1 to 20 of 44
  1. #1
    Member
    Join Date
    Mar 2011
    Location
    Madera
    Posts
    227

    What I learned about spraying gelcoat, tutorial of some sorts...

    Let me start off by saying this: If you are even considering spraying gelcoat, GO FOR IT!!! It is much easier than I ever imagined it being!!! I am no pro or expert and I just want to pass what I have learned on to others. If anyone has any additional tips to add or need to correct my methods, please do so.

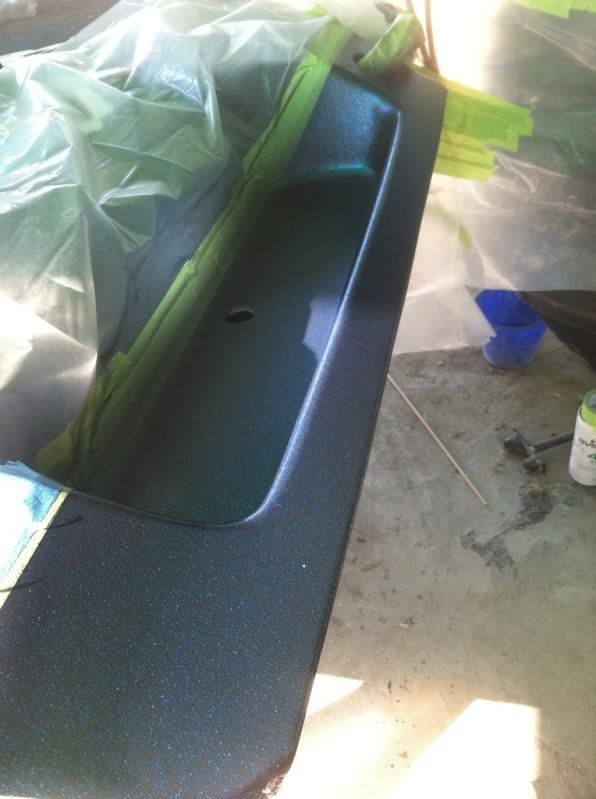
    I have a 1997 Champion 181 DC which needed some gelcoat repairs. I patched up several old transducer screw holes on the transom and needed to re-gel those areas. I also cut the top cap above my transom to expose the wood for drying and the application of CPES, so once that was all glassed over it needed gelcoat as well. The gelcoat work REALLY intimidated me, so I researched it on the web and got even more confused. It seemed that if I found 15 websites or posts on how to spray gelcoat I found 15 different ways of doing it!! I also got A LOT of information from a local fiberglass repair shop, which was surprising. Another local shop would not give me any tips. When asking direct questions the guy would act like he all of a sudden didn't speak English, then either mumble something under his breath or just walk away from me. And I actually spent money there, he had a close match to my poly flake. What I finally put together was the main points from all the different methods.

    1. The purer your gelcoat is the better results you will get. In other words, the less additives in it the better. I heard of guys thinning with Acetone, Lacquer Thinner, MEK, Duratec (this could be a very good option and I may try it on my next project) and Styrene. I chose to thin with Styrene.

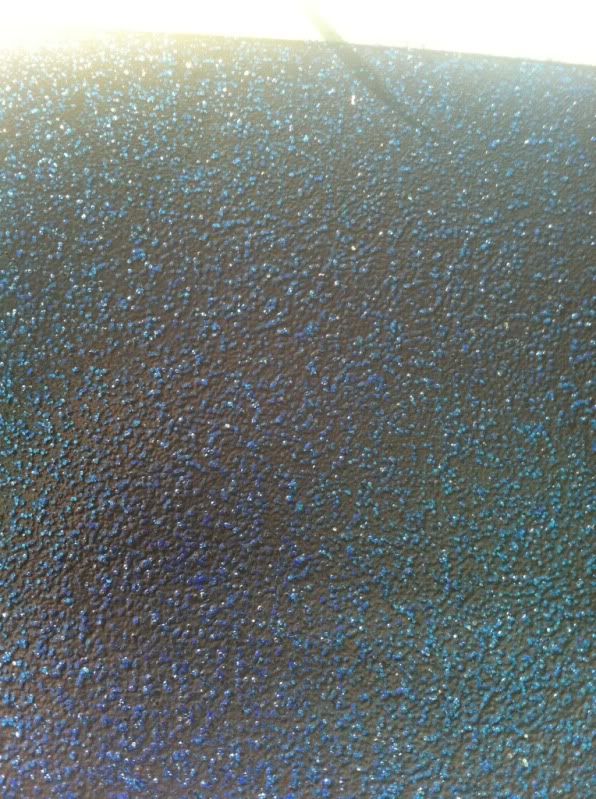
    2. Spraying poly flake is either not an art like so many have claimed, or I am a true artist!!

    3. Prep your area VERY good and plan ahead by prepping a larger area than you initially thought you would need.

    4. Pay attention to your mixtures making sure everything is measured accurately. Also, mix every coat the same and catalyze according to the temperature (I will explain this in more detail later).

    5. Gelcoat is cheaper than paint and more forgiving than paint.

    6. Order twice as much clear as you think you might need when spraying poly flake.

    7. Forget the "cup gun" it's a waste of money unless you are spraying gelcoat into a mold.

    8. Clean your gun with acetone after each batch of gelcoat is applied. Also, don't mix up too much or over catalyze, you may run the risk of it kicking in your gun.


    More to come: Equipment used.


    Modified by dan-k at 1:39 PM 8/15/2011


    __________________________________________________ ____________________

    Three-fourths of the Earth\'s surface is water, and one-fourth is land. It is quite clear that the good Lord intended us to spend triple the amount of time fishing as taking care of the lawn.

  2. Member
    Join Date
    Mar 2011
    Location
    Madera
    Posts
    227
    #2

    Re: What I learned about spraying gelcoat, tutorial of some sorts... (dan-k)

    Here is my equipment/supply list. These may not be the best tools, but they were inexpensive and got the job done with great results.

    1. Spray gun. I used the HVLP paint spray gun from Harbor Freight tools. It has a 1.4-1.5 mm tip and a 20 oz cup. The shop that gave me most of the tips actually uses this gun as well as the 2 qt pressure pot equivalent of it for ALL of their gelcoat application. They are normally priced at $24.99, but they can be had on sale for $9.99. Here is a link:

    http://www.harborfreight.com/a...47016

    NOTE: I also ordered a cup gun from US Composites. I only practiced with it on cardboard so maybe I didn't give it a fair chance. Here is a link to the cup gun, it is the ES 100 model at the top of the page:

    http://www.shopmaninc.com/equipment.html

    2. Air compressor. I used to have a nice Craftsman 220 v compressor, but it was stolen in a burglary and I never replaced it. I bought a 2.5 hp/21 gallon/110 volt unit from Harbor Freight for $159.99. It worked great for spraying the gelcoat, but I wish I had bigger one when running the DA sander. Her is a link to the compressor:

    http://www.harborfreight.com/2....html

    3. Gelcoat. I ordered my gelcoat supplies from US Composites. The only draw back I have found is that they are located in Florida and me in California, so it takes forever for UPS to ground ship the products. I ordered neutral gelcoat and clear gelcoat by the quart from US Composites, I used the standard (not tooling) gelcoat, unwaxed. Here is a link, scroll down to the middle of the page:

    http://www.shopmaninc.com/polyesters.html

    4. Thinners/additives: I used Styrene to thin my gelcoat and surfacing wax on the final coat to get the final cure. The base coat below my poly flake is black, so I ordered some black coloring pigment to mix with the neutral gelcoat. These came from US Composites as well. Links to items:

    http://www.shopmaninc.com/solvents.html

    http://www.shopmaninc.com/pigments.html

    The order was shipped with a nice little measuring cup for the additives, but it would have been useless without a chart that came with the cup gun. The chart broke down the percentages in cc's were for each quart or gallon of gelcoat. This chart may be available for purchase separately, but I don't know.

    Next up, gelcoat spraying....


    __________________________________________________ ____________________

    Three-fourths of the Earth\'s surface is water, and one-fourth is land. It is quite clear that the good Lord intended us to spend triple the amount of time fishing as taking care of the lawn.

  3. Member
    Join Date
    Mar 2011
    Location
    Madera
    Posts
    227
    #3

    Re: What I learned about spraying gelcoat, tutorial of some sorts... (dan-k)

    So, on to the actual spraying part......

    I started off with this:


    This was after the new glass on the top cap and all the body work to the transom.

    I prepped everything to be sprayed by sanding with 120 grit, then giving it a wipe down with acetone. I masked off everything with 3M tape and 3.5 mil plastic purchased at Home Depot.

    I started early in the morning so the temperatures were somewhat moderate (about 72 degrees). For my first batch I mixed 1/2 quart of neutral gelcoat with a bit of black pigment (about 5%), but this part was not scientific. I figured black is black and all I need to do is get good color coverage at the base. I catalyzed this batch at 1.75% and thinned with styrene at 6%. ONCE YOUR MIX IS CATALYZED, STIR IT THOROUGHLY!!! Here is a picture of the black bas coat:


    I thoroughly cleaned my spray gun with acetone, then prepared my second coat. I mixed .25 quart of clear gelcoat and added my flake. Again, the flake was not scientific, I figured I was most concerned with building the flake up and the carrier for the flake was the clear gelcoat. In other words, I would match the consistency of the flake during my spray. I again thinned my gelcoat to 6% with styrene and catalyzed this batch at 1.5%. I progressively lowered my catalyst because of the rising ambient temperature. Here are pictures of the blue flake after application:


    My last coat was .75 quart of clear, thinned at 6% with styrene, with 6% surfacing wax added. I catalyzed this last batch at 1.25%, but the last 1/8th or so of gelcoat kicked in the gun. Here is where I noticed my first mistake, I should have applied two coats of clear over the flake. The flake was .008 and it exaggerated the orange peel effect. I could tell I would probably end up sanding into my metal flake. It turned out that the transom area was plenty thick and sanded out just fine, but the splash well was too thin.

    I also learned something about blending the flake. I originally thought I would feather my coats on, leaving a large overlap with clear between the new gelcoat and the old. This would have worked, but when talking to one of the guys at the "helpful" fiberglass shop, he said to mask off around the corners and blend by sanding it smooth into the old gelcoat. this is what I did, but on some of the less distinguished edges the blue flake "silvered". Looking back, I don't know that he fully realized I was spraying flake, this method would have worked PERFECT for solid colors though.

    Next up: Sanding, compounding, polishing...


    __________________________________________________ ____________________

    Three-fourths of the Earth\'s surface is water, and one-fourth is land. It is quite clear that the good Lord intended us to spend triple the amount of time fishing as taking care of the lawn.

  4. Member
    Join Date
    Mar 2011
    Location
    Madera
    Posts
    227
    #4

    Re: What I learned about spraying gelcoat, tutorial of some sorts... (dan-k)

    Finish work ....

    LET THE NEW GELCOAT CURE FOR 48 HOURS BEFORE COMPOUNDING/POLISHING. I actually started sanding after 24 hours and it turned out fine.

    I sanded all of the orange peel out using a DA sander with 320 grit paper. This made most of the sanding a breeze and actually left a pretty decent starting point!! The first go around I used the typical wet sanding technique, starting with 400g, moving up to 800g, 1000g, and finally 1500g. then I polished with a foam pad on a high speed buffer using 3M rubbing compound. I then switched pads and polished using 3M "perfect-it" machine polish. These are pictures of the preliminary results:


    When I looked at the finish in certain light at certain angles, I could see small pitting where I hadn't gotten all of my orange peel out of the finish. I could also see numerous scratches where I hadn't sanded all of the previous grit out. I hit the whole transom again with 320g on the DA until I had all of the orange peel out. I then wet sanded with 1000g on a palm sander and moved right on to the compound/polish stage. I don't know why, but this yielded much better results and saved a ton of time!!! Here are the final pictures of the transom area, minus a good coat of wax.


    The gelcoat on the right of the corner is old, to the left is the new gelcoat.


    The gelcoat on the left of the corner I this picture is the old, to the right is the new.


    Modified by dan-k at 1:47 PM 8/15/2011


    __________________________________________________ ____________________

    Three-fourths of the Earth\'s surface is water, and one-fourth is land. It is quite clear that the good Lord intended us to spend triple the amount of time fishing as taking care of the lawn.

  5. Member
    Join Date
    Mar 2011
    Location
    Madera
    Posts
    227
    #5

    Re: What I learned about spraying gelcoat, tutorial of some sorts... (dan-k)

    I hope this post motivates more people to do their own gelcoat repairs successfully. I would say I did at least $2000 worth of gelcoat repairs to my boat, just judging by what I have gathered regarding prices for this kind of work. If anyone has any questions please feel free to post or send me a PM.


    __________________________________________________ ____________________

    Three-fourths of the Earth\'s surface is water, and one-fourth is land. It is quite clear that the good Lord intended us to spend triple the amount of time fishing as taking care of the lawn.

  6. Member
    Join Date
    Dec 2007
    Location
    jasper, ar
    Posts
    896
    #6

    Re: What I learned about spraying gelcoat, tutorial of some sorts... (dan-k)

    looks great!


    99 cobra 190d
    99 opti 200

  7. Member sandbarDan's Avatar
    Join Date
    Dec 2010
    Location
    elizabethtown, KY
    Posts
    2,160
    #7

    Re: What I learned about spraying gelcoat, tutorial of some sorts... (mefforda)

    so what did you use to fill in the pits and whatever on the glass work you did?
    Also I guess you shot all three coats one after another with no time inbetween except for gun cleaning?

  8. #8

    Re: What I learned about spraying gelcoat, tutorial of some sorts... (dan-k)

    I may have missed it but I don't see where you got your flake from. Was it polyflake or metalflake? Did you just have blue flake or was there silver mixed in as well?

  9. Member
    Join Date
    Mar 2011
    Location
    Madera
    Posts
    227
    #9

    Re: What I learned about spraying gelcoat, tutorial of some sorts... (Reedbassn)

    I actually did most of the body work with glass mat and resin. The small imperfections were filled with bondo glass and thickened polyester resin.

    I shot all three coats one after the other with a gun cleaning in between.

    Flake was purchased at a local fiberglass repair shop, but the original label was minicraft. It is polyflake blue with a bit of gold in it. The original flake in the boat is all blue, but what he had was a very close match.


    __________________________________________________ ____________________

    Three-fourths of the Earth\'s surface is water, and one-fourth is land. It is quite clear that the good Lord intended us to spend triple the amount of time fishing as taking care of the lawn.

  10. Member
    Join Date
    Sep 2007
    Location
    Portland, ME
    Posts
    247
    #10
    This should be pinned to the top of the page. Nice work.

  11. Member thomasfouraker's Avatar
    Join Date
    Jun 2008
    Location
    Jacksonville
    Posts
    1,223
    #11

    Re: (seagoo)

    Fantastic job! You should be proud of your work.

    In person does it look close to factory?
    2001 Mercury Optimax 225
    0T344965
    2000 Mercury ELPTO 125
    0T072885

  12. Member
    Join Date
    Mar 2011
    Location
    Madera
    Posts
    227
    #12

    Re: (thomasfouraker)

    Thanks for all of the compliments!! In person it looks very close to factory. The only way to see a difference is if you notice the small amount of gold flake in the new gelcoat. If I had it to do over, I would have ordered my flake direct from minicraft in Florida. They have a Champion page with all of the factory matched flakes. I will be respraying my splashwell next week when more gelcoat arrives. Also, those HF HVLP spray guns go on sale for $9.99 this Friday, I am going to buy at least three of them.


    __________________________________________________ ____________________

    Three-fourths of the Earth\'s surface is water, and one-fourth is land. It is quite clear that the good Lord intended us to spend triple the amount of time fishing as taking care of the lawn.

  13. Member
    Join Date
    Feb 2007
    Location
    Collinsville, IL
    Posts
    7,223
    #13

    Re: (dan-k)

    <table width="90%" cellspacing=0 cellpadding=0 align=center><tr><td>Quote, originally posted by dan-k &raquo;</td></tr><tr><td class="quote"> Also, those HF HVLP spray guns go on sale for $9.99 this Friday, I am going to buy at least three of them. </td></tr></table>

    where do you find that sale?

  14. Member
    Join Date
    Mar 2011
    Location
    Madera
    Posts
    227
    #14

    Re: (STRETCH1)

    <table width="90%" cellspacing=0 cellpadding=0 align=center><tr><td>Quote, originally posted by STRETCH1 &raquo;</td></tr><tr><td class="quote">

    where do you find that sale?</td></tr></table>

    It was in the paper ad they gave me at the register.


    __________________________________________________ ____________________

    Three-fourths of the Earth\'s surface is water, and one-fourth is land. It is quite clear that the good Lord intended us to spend triple the amount of time fishing as taking care of the lawn.

  15. Member
    Join Date
    Aug 2011
    Location
    Knoxville TN
    Posts
    23
    #15

    Re: (dan-k)

    Great information, just as you have said most of those in the know are not willing to share.
    I have been gel coating a 2003 ranger intercoastal I have had good results with the bottom it is white, but the sides have red metal flake hockey stripes which I have had poor results with adhesion. On two separate attempts sanding with 100 grit and cleaning with acetone the clear metal flake peels off of the original flake in sheets with very little mechanical and no chemical adhesion. The clear top coat stuck fine where it oversprayed onto the white. Can you offer any advice? Is there some special primer or adhesion promoter? I noticed you applied black on your flake before coating was this primer?
    Thanks.

  16. Member
    Join Date
    Mar 2011
    Location
    Madera
    Posts
    227
    #16

    Re: (woody7978)

    <table width="90%" cellspacing=0 cellpadding=0 align=center><tr><td>Quote, originally posted by woody7978 &raquo;</td></tr><tr><td class="quote">Great information, just as you have said most of those in the know are not willing to share.
    I have been gel coating a 2003 ranger intercoastal I have had good results with the bottom it is white, but the sides have red metal flake hockey stripes which I have had poor results with adhesion. On two separate attempts sanding with 100 grit and cleaning with acetone the clear metal flake peels off of the original flake in sheets with very little mechanical and no chemical adhesion. The clear top coat stuck fine where it oversprayed onto the white. Can you offer any advice? Is there some special primer or adhesion promoter? I noticed you applied black on your flake before coating was this primer?
    Thanks.</td></tr></table>

    I'm not too sure what could be causing that problem. Did you sand into the existing flake? What base color is below the existing flake? My best guess would be that your new gelcoat contains too much flake, which is inhibiting the adhesion to the old flake. When I sprayed mine I "sandwiched" the flake coat between two un-cured layers of new gelcoat, which cured all together. If there is no base coat below your flake, you may try laying a coat of clear, then spray your clear/flake, then seal it all with a good coat of clear.

    Also, what brand and type of gelcoat are you using? You want to make sure to use the unwaxed, non tooling gelcoat. I hope this helps!


    __________________________________________________ ____________________

    Three-fourths of the Earth\'s surface is water, and one-fourth is land. It is quite clear that the good Lord intended us to spend triple the amount of time fishing as taking care of the lawn.

  17. Member
    Join Date
    Aug 2011
    Location
    Knoxville TN
    Posts
    23
    #17

    Re: (dan-k)

    Thanks Dan
    I did sand into the flake in some places and just scuffed in others.I added about 3oz of flake to a quart of clear from ranger thinned with styrene.
    The under color appears to be just the fiberglass mat or dark tranparent color.Ranger said there was only red mist flake no under color. I did not clear first but,I had masked off the silver pin stripe and then cleared over the red and silver and the clear came off the silver stripe along with the flake.

  18. Member
    Join Date
    Mar 2011
    Location
    Madera
    Posts
    227
    #18

    Re: (woody7978)

    Woody, if I read correctly it seems you got your gelcoat from ranger. It may be tooling gelcoat intended for spraying into a mold. You may want to check into this, just a thought....


    __________________________________________________ ____________________

    Three-fourths of the Earth\'s surface is water, and one-fourth is land. It is quite clear that the good Lord intended us to spend triple the amount of time fishing as taking care of the lawn.

  19. Moderator
    Join Date
    Feb 2007
    Location
    Granby MA
    Posts
    10,432
    #19
    nice job!

  20. Member
    Join Date
    Aug 2011
    Location
    Knoxville TN
    Posts
    23
    #20

    Re: (dan-k)

    Dan, I contacted ranger .The repair shop was very helpful, but have no clue as to my issue. The tech there said they spray black gel to back up their red flake repairs using a binks siphon type gun. He said they do not thin with anything. I asked him how much flake to add he said they do not measure it just added until a Popsicle stick will stand without falling in the cup, so I don’t see how I could have added too much flake. I am going to try again this time using duratech gray primer tinted black before adding my flake coat to see if that helps,I’ll try a test patch first. I contacted US composites they seem to think I have a silicone or Teflon contamination, but I have removed the rub rail where that could not be a problem and it peels the same. Wish me luck I will let you know after I get the primer and test it.

Page 1 of 3 123 LastLast

Similar Threads

  1. gelcoat help, when to add wax when spraying
    By jameson93 in forum Bassboat Restoration
    Replies: 0
    Last Post: 01-06-2012, 07:13 PM
  2. Questions about spraying gelcoat.
    By dan-k in forum Bassboat Restoration
    Replies: 5
    Last Post: 07-07-2011, 09:45 AM
  3. totalbeverage, ?'s about spraying gelcoat
    By lousyfisher in forum Bassboat Restoration
    Replies: 16
    Last Post: 07-15-2010, 02:21 PM
  4. Spraying Gelcoat
    By bkfish in forum Bassboat Restoration
    Replies: 3
    Last Post: 11-23-2007, 12:58 PM
  5. Spraying Gelcoat
    By Extra260 in forum Bassboat Restoration
    Replies: 4
    Last Post: 03-04-2007, 02:31 AM